- QuickBooks Online Sandbox (for development and testing)
- QuickBooks Online (for production)
Overview
In order to set up the integration there are a few steps that must first be completed.- Create an app in the Intuit Developer Portal.
- Complete the app assessment questionnaire.
- Once your app is approved you will be able to access your production keys.
- Add your secure keys to the RootFi dashboard and start pulling data!
Part 1 - Create your Quickbooks Application
When you create a QuickBooks Online app in the Intuit Developer Portal, you can choose to configure it for the sandbox environment or production environment. The app will have two sets of keys: development and production. We recommend first configuring your app for the sandbox integration so you can test thoroughly before going live. You can access your dev keys in the Development Settings section of your Quickbooks dashboard. Perform these actions in the Intuit Developer Portal.- Click on Dashboard from the nav bar at the top of the screen.
- Select Create an app.
- Select QuickBooks Online and Payments, and enter your app name.
- Under Select a scope, choose com.intuit.quickbooks.accounting.
- Click Create app.
- Configure the app to connect to the sandbox environment:
- In the left menu, click on Development Settings > Keys & credentials.
- In the Redirect URIs section, select ‘Add URI’.
- In the ‘Link’ box on top, enter the RootFi URI: ROOTFI CALLBACK URL
- Then click Save.
- Your development keys (client ID and client secret) will be displayed in the ‘Keys’ section at the top of the page.
- Copy these keys and simply paste them into the Quickbooks Sandbox integration on the RootFi Platform.
Part 2 - Completing the App Assessment Questionnaire
- Select Production Settings > Keys & Credentials, from the nav bar on the left.
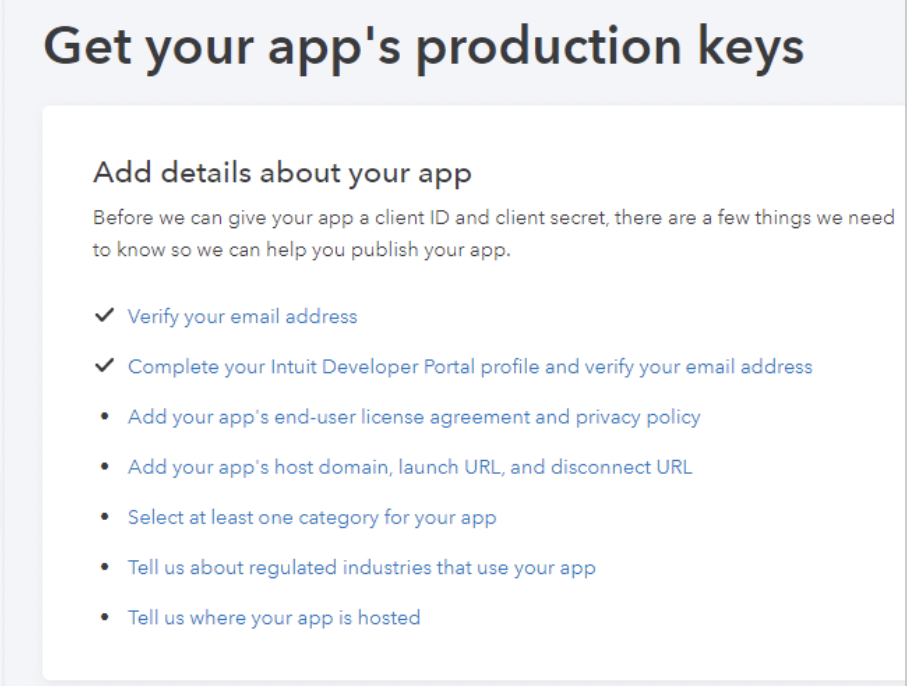
- Then theGet your app’s production keys page will come up.
- Enter the information required in the Add details about your app section:

- Complete the App Assessment Questionnaire as described in the previous section.
- Once you complete all the steps and your questionnaire responses have been approved, the page will update to display your production keys.
- Go to Production Settings > Keys & Credentials, and configure your app to connect to RootFi:
- Go to the Redirect URIs section, and select Add URI.
- In the top Link box, enter the RootFi Production URI: Need to add
- Then click ‘Save’.
Part 3 - Enter your Client ID and Client Secret on the RootFi Dashboard
To activate your Quickbooks integration, follow these steps on the RootFi platform:- Log in to the RootFi dashboard.
- Select the ‘Integrations’ tab on the sidebar - here you will see a list of platforms you can integrate with.
- Click the ‘Set Up’ button which is present on the Quickbooks card.
- When the form opens up simply enter the ‘Client ID’ and ‘Client Secret’ which you generated on the Intuit Developer Portal and click ‘Save’.

